

Hints and Tips:
How To Take (Pretty Good) Skate Photos
by Bud Stratford
Along with The Crappy Camera Photo Contest, I thought I’d give all y’all a few Crappy Camera Photo Tips to help you increase your chances of winning some of that prize booty. None of these things are too terribly difficult to do, and none of them will cost you one single red cent. But they are simple, easily achieved, common-sense guidelines to taking pretty snappy skate photos.
They are, as follows:
1. Focus, Focus, and Focus
By far, the most important part of taking a good (or great) skate photo is getting the focus right. For most crappy cameras, this will be “automatic”; either they will have no focus feature whatsoever (in the case of old film point-and-shoot cameras, toy cameras, or disposable cameras), or they will have an “auto focus” feature (like most modern digital point-and-shoots and cellphone cameras).
Be sure that you focus on the spot where the skater is going to be skating when you shoot the photo, not some tree, building, or car way off in the distance. The best way would be to pre-focus by having the subject (ie, the skater) simply stand at the spot they’ll be skating; focusing the camera on them; and then, having them try their trick.
Most photos can be fixed pretty easily on your home computer, using stock programs. But focus is not one of those things that can be fixed. Either it’s in focus, or it isn’t.
2. Lighting
The best rule of thumb is that the sun should be facing the skater’s face at all times. Especially considering that we will probably not be using flashes; in that case, Mr. Sunshine becomes your de-facto flashbulb. Make sure you use him effectively by making sure that he is as bright as possible (the fewer clouds, the better), and suitably located.
The sun should always be directly in front of the skater, and directly to your back, whenever possible. This is hardest at high noon (when the sun is directly overhead) and at night (when there is no sun at all), but easiest in the morning and evenings (when the sun is rising to the east, or setting to the west, respectively). That means that the best direction for the skater to be facing in the early morning, is east. If that obstacle that they want to skate happens to be facing west, then it would be best to come back in the afternoon to shoot the photo. Make sense…?
Also try to make damn sure that your subject is in clear, wide-open light, not in the shadow of a building or something. Of all the variables, “lighting” will probably be the most maddening to get right. If it wasn’t maddening, it wouldn’t be very fun, and you wouldn’t learn anything along the way. So learn to love frustration, and appreciate it as the gift it truly is.
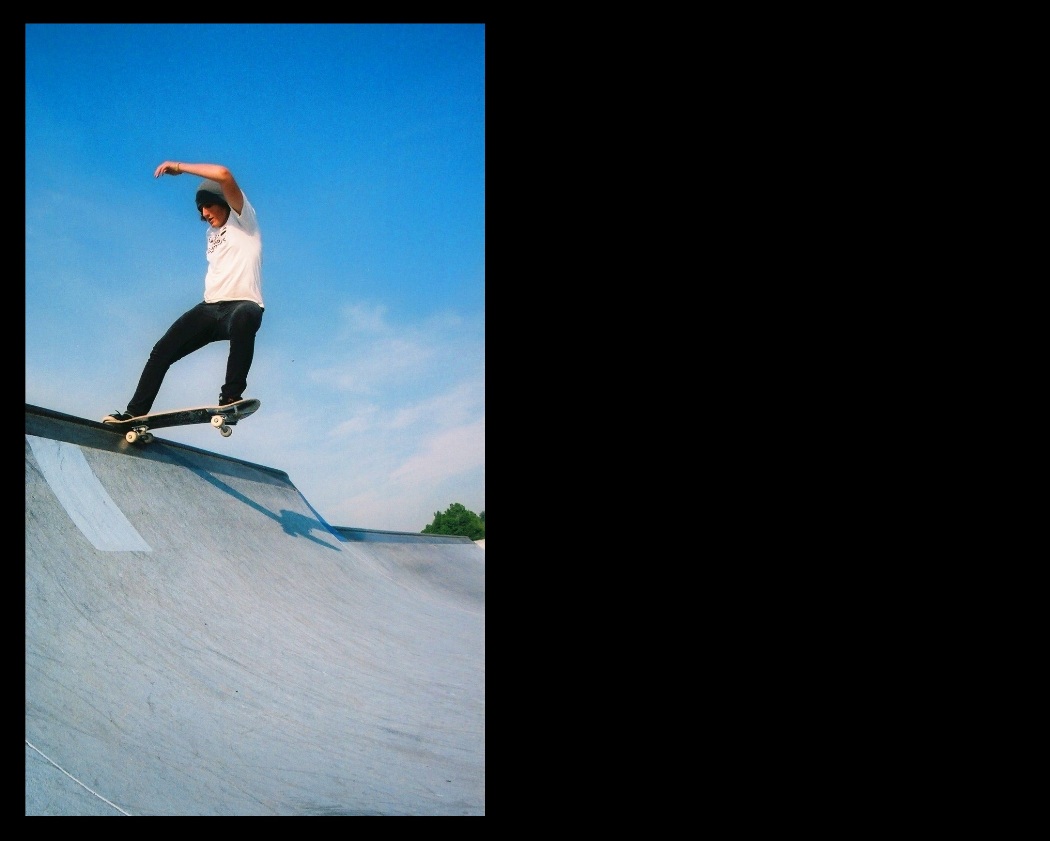
I have no idea who this is. I snapped this photo on Go Skateboarding Day 2008 at Major Taylor Skatepark in Indianapolis, Indiana. I was set up to shoot somebody else, and this guy came along and popped into a clean tailslide right in front of me… so, I pushed the button and captured it forever. The early-morning sun (rising in the east) gave me great lighting for this one. Sometimes, even the dumbest of us (that’s me) get lucky.
3. Composition
“The Rule of Thirds” is the best rule of thumb here. Very few great skate photos have the subject directly in the center of the frame; most have the skater offset to one of the upper quadrants of the frame. The standard rule is to have the subject 1/3rd of the way below the top edge of the frame, and 1/3rd of the way from the left or right edges of the frame. See the diagram below for a visual explanation of all this stuff; it’s way easier to see than it is to explain.

The photo on the right is Kiya Jellison’s pop shove-it down the Rio Vista Ten; the version on the right is divided up (using bold red lines) to illustrate the composition using “The Rule of Thirds”. This one is damn near textbook. Even I get it right sometimes.
4. Perspective
Personally, I shoot almost exclusively from “Worm’s Eye Perspective”, where I’m lying flat on the ground, with the camera as low as possible (or even touching the ground itself), looking at the viewfinder. This perspective almost always makes the skating look bigger, and more dramatic. You’ll get really dirty and sore in the process, but trust me on this one, it’s way worth it.
Other perspectives are cool, too, so feel free to try them out. Climbing trees or buildings for elevated perspectives, or crawling into bushes to create depth work pretty well, too. But the most boring perspective ever, is standing straight up in front of your subject, shooting the photo. Never, ever use that one.
If you’re not physically uncomfortable shooting your photo, then you’re probably doing it wrong.

This photo of Paul Bacher doing an alley-oop off the extension, was shot up at Prescott’s skatepark last year after their annual amateur contest had ended for the day. It was taken with the camera almost sitting right on the flatbottom of the bowl; I was lying on the ground, looking through the digital screen on the back of the camera. Came out pretty okay, I think.
5. Color Vs. Black and White
Most cameras shoot in color these days almost exclusively, but the photos can be turned into black and whites pretty easily after you’ve uploaded them to your PC, and opened them up in any kind of photo editor program. Black and white photography is beautiful and “arty”, while also being a useful tool to correct color and lighting deficiencies. Photos that look really bad as color photos sometimes look absolutely stunning as black and white photos, so feel free to experiment with that a bit.
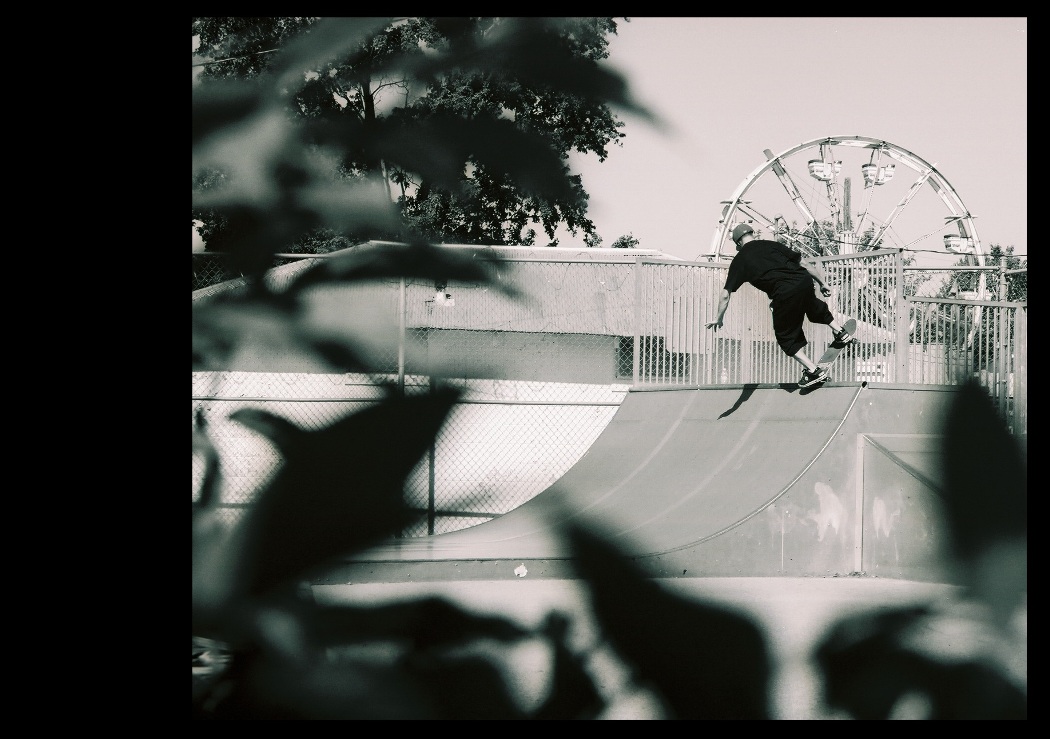
I took this photo of Crazy Gary in Marshall, Illinois back in 2008, while I was on my midwest tour. Of course, it would have been better if Gary was facing me, but we can’t always have everything our way, now can we? I really liked the tension between the ferris wheel in the background, and the leaves in the near foreground; I shot this through a shrub, and it’s a great example of what’s possible using unusual perspectives coupled with the black and white format.
Lastly, but maybe the most importantly:
6. It’s Okay to Fail.
Maybe you think that photo you just took sucks. Maybe your buddy thinks it’s the best photo ever. But maybe Lew, Claudia, Dan, and Tony will want to give you a hundred bucks for it; they’ll probably be even more enthusiastic about it when they realize it’s my hundred bucks that they’re shelling out. If in doubt, send the damn photo in anyway. Maybe it’s better than you think.
Maybe you’ll learn along the way that as long as you’re trying, then “failure” is absolutely impossible. The only time you fail, is when you don’t try. Then, failure is absolutely guaranteed.
That’s about all there is to it, kids. It’s not so difficult, now is it? Now get out there, burn some film (so to speak… “burn some pixels” would be far more accurate), get in a little practice, and then have at it. Shoot some skating, send it in, and claim your prizes. Best of luck to ya, and thanks for participating…!